Category: Guides

See the latest guides and useful tips on Cryptocurrency research and learn how to do your own research by using CoinCheckup.com.

  • How to Transfer Money From Payoneer to Binance in 2026 – Easy Steps

    How to Transfer Money From Payoneer to Binance in 2026 – Easy Steps

    Many users are looking to bridge their global finances with cryptocurrency trading and are seeking ways to link Payoneer with Binance. If you’re among them, you’ll first need to create and verify your Payoneer account

    While Payoneer itself doesn’t directly support transfers to Binance, you can workaround this by using your Payoneer card to purchase cryptocurrency on Binance. This method involves selecting the “Credit/Debit Card” option on Binance and entering your Payoneer card details. But before you can make that purchase, there are a few more steps you need to take.

    Key takeaways:

    • Ensure both your Payoneer and Binance accounts are fully verified and have sufficient funds for transactions.
    • You can link your Payoneer card to Binance by selecting the “Buy Crypto” with credit/debit card option and entering card details.
    • If you’re looking for alternatives, consider platforms such as Paxful, LocalCoinSwap, Noones, BitValve, and Hodl Hodl for buying crypto directly with Payoneer funds.
    • You shouldn’t forget about Payoneer’s fees and charges, such as withdrawal fees, currency conversion fees, and potential bank or payment processor fees.

    Create and verify your Payoneer account

    First thing you need is a Payoneer account, of course. To create it, start by visiting the Payoneer website and clicking the “Register” button. Simply follow the on-screen instructions to complete the registration process.

    After setting up your account, log in and head over to the Verification Center, located in the Settings menu. Here, you’ll be required to submit documents like proof of identity, proof of residence, and any other information relevant to your account type. These details should be consistent with the information you provided during registration to avoid any issues.

    Double-check the accepted documents for each category. For instance, proof of residence can be a recent utility bill, bank statement, or rental agreement, but it must be dated within the last three months. 

    Make sure that all your documents exactly match your registration details to prevent delays in the verification process. This verification step is necessary to confirm your identity and safeguard your account.

    Payoneer typically takes 2-3 business days to review your application and verify your account. After that’s passed, you’ll receive a confirmation of your account status.

    How to transfer money from Payoneer to Binance?

    To transfer money from Payoneer to Binance, you first need to ensure that you have a Payoneer Card. This is something you can request from Payoneer once your account is ready, and they will send it to you via physical mail.

    Register on Binance and verify your account

    You need to register on Binance and verify your account before buying crypto with Payoneer. Once you’ve signed up, you must verify your account by completing the KYC (know your client). This is essentially identity verification, and it typically involves submitting identification documents and proof of address.

    To verify your account, log in and go to the settings or verification section. Follow the prompts to upload the necessary documents and enter the required information. Once your documents are reviewed and approved, your account will be verified. It is possible to do certain actions on Binance without completing the verification, but you won’t be able to withdraw your funds properly. Bottom line, it’s in your best interest to verify your account asap.

    After verification, you can safely use your Payoneer card to buy crypto on Binance. Be sure to understand any withdrawal fees from Payoneer and processing times before transferring funds to your bank account and then to Binance.

    With a verified account, you’ll be able to trade or withdraw your funds as needed, adhering to any withdrawal limits set by the platform.

    5 Steps to transfer money from Payoneer to Binance

    You’ve completed the registration and verification process on Binance, now it’s time to buy crypto with Payoneer. To do this, follow the steps below:

    1. Sign into your Binance account: Start by signing into your Binance account via a desktop browser or mobile app.
    2. Buy crypto with a credit card: Select the “Credit/Debit Card” option from the “Buy Crypto” drop-down menu on the Binance homepage.
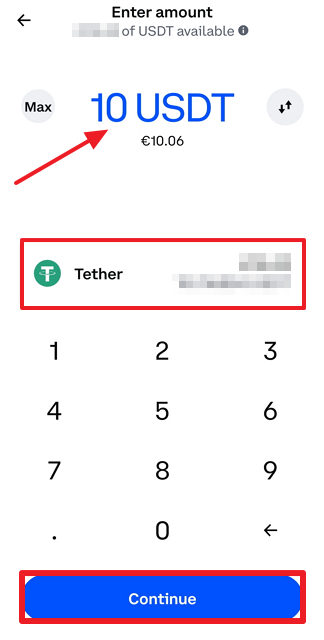
    1. Enter the amount of fiat currency you want to spend: Select the fiat currency you want to use and pick the cryptocurrency you want to purchase. Click “Continue” to proceed.
    1. Enter your Payoneer card details: Provide the relevant card details, including your name, card number, expiration date, security code, and address. Click “Confirm” to proceed.
    1. Confirm the transaction: You’ll be presented with a confirmation window that displays your order’s details, including the fiat total, the amount of transaction fees, and the exchange rate.

    In the case of Binance, you’ll have 10 seconds to confirm your transaction. The short time window is meant to guarantee against any rate changes that could occur before the order is confirmed. Otherwise, you’ll need to repeat the process.

    If you are content with your order, click “Confirm” to buy Bitcoin and thus transfer funds from your Payoneer account to Binance.

    Alternative options

    Another way to broaden your crypto purchasing options is by using a peer-to-peer (P2P) crypto marketplace. Platforms like Paxful, LocalCoinSwap, Noones, BitValve, and Hodl Hodl allow you to buy cryptocurrency directly from other platform users. Also, some exchanges, such as KuCoin or Bybit, feature their own P2P marketplace.

    This method can help you minimize fees on crypto transactions, although this depends on the seller. A key advantage of P2P marketplaces is the flexibility to use Payoneer in different ways. Instead of solely relying on your Payoneer card, you might be able to use Payoneer for a direct bank transfer, depending on the seller’s preferences.

    Let’s take a look at some of the more prominent P2P crypto marketplaces.

    LocalCoinSwap

    LocalCoinSwap is a peer-to-peer cryptocurrency marketplace that allows you to buy and sell cryptocurrencies directly with other users.

    This decentralized platform supports multiple payment methods, including Payoneer, which makes it convenient for converting fiat funds into cryptocurrencies.

    Using LocalCoinSwap, you can filter merchants based on their payment methods, transaction volume, and reputation ratings, ensuring safer and more reliable trading experiences. The platform also features an escrow system that ensures security during transactions, protecting both buyers and sellers until the trade is completed.

    The platform charges 1% in fees for sellers, while there is no fee for buyers responding to offers.

    Noones

    Noones is a P2P crypto marketplace boasting over 450 payment methods, which means it has the most extensive variety of merchants. However, many sellers on the platform charge a premium, and you may find yourself paying around a 3% markup on transactions. 

    To start, research reliable merchants on the platform by checking their ratings, transaction completion rates, and volume of trades to ensure a safe transaction.

    Once you’ve identified a suitable merchant, initiate the transaction by sending your Payoneer funds in exchange for cryptocurrency, such as USDT or Bitcoin. After receiving the cryptocurrency in your wallet, you can then transfer it to your Binance account for trading or holding.

    Noones doesn’t charge fees to buyers, while sellers face a 1% fee, with lower fees for bank transfers (0.75% for amounts under $50,000 and 0.1% for amounts over $50,000).

    BitValve

    BitValve is another trusted P2P crypto marketplace that accepts multiple payment methods, including Payoneer.

    Though the number of sellers accepting Payoneer is lower compared to other platforms, BitValve is worth exploring, especially if you’re having trouble finding a suitable seller elsewhere. With a growing community and fast transactions, it’s a solid alternative.

    Hodl Hodl

    With its amusing name, Hodl Hodl offers users a private, identity verification-free experience, which will appeal to privacy-conscious traders. However, the platform only supports Bitcoin transactions, so if you’re seeking to buy other cryptocurrencies, you’ll need to look elsewhere.

    Hodl Hodl charges a minimal 0.3% fee for both buyers and sellers. The platform’s reputation system allows users to check merchant reliability before committing to any deals.

    Payoneer fees and charges

    Buying crypto with Payoneer will most likely incur certain fees.

    When withdrawing funds from Payoneer to a local bank account, you’ll be charged a standard withdrawal fee of $1.50, which may vary based on the currency and country of the receiving bank.

    Also, currency conversion fees apply if you withdraw funds in a currency different from your Payoneer balance. This typically ranges from 0.5% to 2% above the mid-market rate.

    You need to keep this in mind to avoid unexpected costs.

    FAQs

    Can I use Payoneer for crypto?

    Yes, you can use Payoneer to buy cryptocurrency, although Payoneer itself doesn’t directly support crypto transactions. You can use your Payoneer card on exchanges like Binance or through P2P marketplaces that accept Payoneer as a payment method.

    Does Binance accept Payoneer?

    Binance doesn’t directly accept Payoneer for transfers. However, you can use your Payoneer card to purchase crypto on Binance by selecting the “Credit/Debit Card” option during the buying process.

    How to buy USDT with Payoneer?

    To buy USDT with Payoneer, you can either use your Payoneer card on Binance by selecting the “Credit/Debit Card” option or buy USDT through a P2P crypto marketplace that accepts Payoneer as a payment method. Simply choose a seller who supports Payoneer, and complete the transaction.

    The bottom line

    Transferring money from Payoneer to Binance is a relatively simple process. By following the step-by-step guide, you can easily use your Payoneer funds to buy crypto using the Payoneer card. First, make a Payoneer account, verify it, and fill it with funds, then use your Payoneer card as the key to purchase cryptocurrency directly on Binance. Alternatively, navigate through P2P marketplaces that accept Payoneer funds as a more direct way to purchase crypto.

  • How to Fix MetaMask Issues in Geographically Restricted Areas

    How to Fix MetaMask Issues in Geographically Restricted Areas

    MetaMask, the free browser extension and crypto wallet, has faced geofencing restrictions. MetaMask has blocked users from certain jurisdictions, including Venezuela, Russia, Iran, and more. The issue has sparked outrage in the crypto community. 

    However, users have options to bypass these geofencing restrictions, but they may be subject to legal compliance. This article examines the issue surrounding MetaMask and the possible solutions to fixing the geofencing restrictions.

    Understanding MetaMask’s Geofencing Restrictions

    Metamask’s geofencing restrictions in certain countries are due to legal compliance issues related to US sanctions programs. The restrictions are a result of changes made by Infura. MetaMask relies on Infura, a blockchain node infrastructure to access the Ethereum blockchain.

    The geofencing restrictions are not a ban, but rather, blocking access to MetaMask’s platform. Although Metamask has not publicly disclosed the specific reasons that have led to these restrictions, it is clear that it is intended to prevent users from buying, selling, trading, and using a MetaMask casino using the Ethereum blockchain within these blocked regions. 

    Several users expressed disappointment and outrage over the restrictions, which have prevented them from accessing their crypto wallets. Most users complained saying their transactions sent through MetaMask were not realized. The first to report the issue were Iranians who realized their accounts were either reportedly locked or users were deactivated. 

    Users in restricted countries face challenges related to internet censorship and geofencing restrictions, limiting their access to certain services and websites, including OpenSea and Infura. These restrictions are often due to compliance with the US and impact users’ ability to interact with the Ethereum network, transfer NFTs on OpenSea, and access other cryptocurrency services.

    Exploring Potential Solutions

    Despite these challenges faced by users, MetaMask has provided its users with possible solutions:

    Switch to Alchemy

    Users can switch their MetaMask wallet endpoint to Alchemy. Alchemy is an Infura competitor. Alchemy has outlined specific guidelines for anyone who wants to use its servers. Here’s a quick guide on how to do so:

    • To switch to Alchemy you will need to create a free Alchemy account. You will need an Alchemy API key to replace the MetaMask endpoint.
    • Once you’ve created the account, you will need to create an API key for the Ethereum Network on Metamask. From the dashboard homepage, select the apps tab before choosing ‘create app’. Name your app under the description, and type in ‘development’ in the Environment block, before selecting your Mainnet as Network. Click on the app you named and created, then select “View Key” to import the WebSocket API key into Alchemy’s code.
    • Once the step is completed, head to your MetaMask wallet and select the network dropdown menu. Click on “Custom RPC” in Metamask.
    • Fill in the specific network details as per Alchemy’s instructions.

    It is important to note that this may not work since Alchemy’s terms of service do not accept subscribers from countries that are not allowed to use its services. However, there are other options to try. 

    Use a VPN

    Users can try using a Virtual Private Network (VPN) to spoof Infura. This might give you access to Metamask. Using a VPN might not work either, since both Infura and Alchemy are US-based companies. Users may experience limitations when using VPNs including network reliability, legal consequences, and cybersecurity concerns.

    Import Wallet

    If using a VPN and switching to Alchemy is unsuccessful, users can try to import their wallets into another price of client software. The client software in this case refers to other Ethereum wallet applications or platforms that allow users to interact with the Ethereum network that could access crypto casinos, interact with smart contracts, or buy or sell non-fungible tokens. Client software could include self-custodial wallets like MyEtherWallet, and Trust Wallet, or hardware wallets like Trezor or Ledger.

    The Importance of Self-Custody

    Self-custody refers to holding and managing your own digital assets, without having to rely on third-party custodians. In the case of Metamask’s geofencing restrictions, self-custody is crucial as it ensures that you have direct control over your funds. This allows you to access them independently, even if you are unable to use MetaMask in certain jurisdictions.

    Additionally, self-custody improves security as users are responsible for safeguarding their private keys and seed phrases. This reduces the risks associated with hacking, mishandling of assets, and unauthorized access to your funds. Overall, self-custody allows you to be in control when external factors, like the restrictions faced by MetaMask, may limit access to centralized services.

    Finally, self-custody allows users to access decentralized applications and participate in various blockchain activities without having to rely on third-party centralized services. Instead, create a non-custodial wallet, like a hardware or paper wallet that gives you full control over your private keys. Although self-custody has its own challenges, it could prevent users from getting locked out from using their wallets.

  • What is AAVE?

    What is AAVE?

    Aave network is a decentralized protocol, which helps users to engage in borrowing and lending activities involving crypto assets. The interaction mechanism within Aave technology closely mirrors the conventional lending institutions, ensuring a seamless and familiar experience for users. However, what distinguishes Aave is its utilization of cryptocurrency as the primary medium for these financial transactions. 

    By operating on the Ethereum blockchain, Aave leverages the efficiency and security inherent in blockchain technology. This article presents an overview of Aave blockchain, encompassing its fundamental features, utilization particulars and methods of accruing earnings.

    What is AAVE’s Current Price?

    The dynamic nature of the Crypto World is known to everyone – and what is AAVE crypto if not a great example of such changes? That means in order to learn its current value it would require real-time monitoring before buying. One of the most convenient ways to make AAVE swap is the SimpleSwap service. It allows users to buy, sell, and swap 1500+ crypto assets. 

    The SimpleSwap service:

    • Does not require to register;
    • Offers fixed and floating rates;
    • Allows buying crypto for fiat;
    • Has Loyalty and Affiliate programs, as well as Invite system.

    How Does AAVE Work?

    Aave represents a decentralized lending protocol. The platform offers a way to borrow crypto assets without any centralized intermediary. However, this service not only presents an opportunity to lend cryptocurrency, but also provides its users with its own token.  What is AAVE crypto? It is a governance token, whose owners have the right to take part in governance decisions, such as voting on asset additions, and can also stake their tokens for protocol security.

    Why Use AAVE?

    The utilization of Aave network presents many positive aspects that appeal to investors and participants in the decentralized finance space. 

    AAVE transaction speed

    Initially, the protocol operated exclusively on the Ethereum network, but currently, it has expanded to include networks such as Arbitrum, Avalanche, Fantom, Harmony, Optimism, and Polygon. These various blockchains and scalable solutions can significantly impact the transaction speed of Aave. Each of them has its own characteristics and advantages in terms of scalability and transaction speed. Therefore, users interested in the transaction speed of Aave can explore the specifications of each integrated network and choose the one that best suits their needs.

    Staking Opportunities

    Staking AAVE tokens plays a crucial role in supporting the protocol. In simple terms, people who hold AAVE can lock them up in the Safety Module (SM) and, in return, receive rewards. The SM acts like an extra security measure for liquidity providers. Alternatively, AAVE can also be staked in liquidity pools for loans, giving users the opportunity to earn interest on them.

    AAVE Technology

    At the core of AAVE’s functionality lies its innovative technological infrastructure. Smart contracts, self-executing codes with predefined rules, form the backbone of AAVE’s operational framework. These contracts autonomously execute lending and borrowing transactions, ensuring the integrity and transparency of financial agreements.

    AAVE Basics

    The foundation of any modern physical ecosystem is the services through which businesses can borrow and lend out their assets. Loans allow you to use capital to solve problems, and lending allows you to receive regular income from idle assets. Cryptocurrency developers recognized the need for such services and launched proposals. Aave blockchain positions itself as one of the largest projects of its kind.

    The AAVE Founders

    The creator of the Aave platform is the Finnish programmer Stani Kulechov. His interest in blockchain technology dates back to his university days, where he foresaw the potential for its development. Recognizing the promising prospects, Kulechov decided to create his own decentralized platform.

    Embarking on his journey in blockchain technologies, Stani Kulechov founded the company ETHLend in 2017. Later, in an attempt to address liquidity challenges, the programmer opted for rebranding, renaming the company to “Aave” in 2018, meaning “ghost” in Finnish. The project team explains that this name reflects the brand’s commitment to intriguing users with innovative technologies and its focus on establishing a transparent and open infrastructure for decentralized finance.

    Uses of AAVE

    Aave Lending

    Lending within the Aave platform is a straightforward process that involves depositing any of the supported assets into a designated liquidity pool. For doing so, users get aTokens, which symbolize a proportional ownership stake in the total liquidity deposited within the pool. These aTokens also serve as a verifiable record, acknowledging lenders’ entitlement to both their principal amount and any accrued interest. When it comes time for lenders to reclaim their loaned assets and the accumulated interest, they start a process known as “burning” of aTokens. 

    Aave Borrowing

    Customers have the opportunity to secure loans from liquidity pools by offering collateral, with an associated interest rate applied to the borrowed amount. The necessary collateral amount varies based on the specific pool. Aave exclusively accepts particular low-risk digital assets, including stablecoins, BTC, and ETH, as eligible collateral.

    Aave’s borrowing framework provides users with optimal flexibility for loan repayment, affording them the ability to settle their loans in full or partially at their discretion, and at any point in time.

    AAVE Flash Loans

    Short-term loans provide any user with access to significant funds, but borrowed assets must be repaid along with a fee within a single transaction. The 0.09% fee of the short-term loan serves as a source of income for the Aave protocol.

    To initiate a flash loan, a customer requests the Aave protocol to transfer assets from pools into a smart contract. Typically, the smart contract is specifically designed to execute a particular task. Upon completion of the specific transaction, it returns the principal to the pool. Upon receipt, Aave conducts a deposit check to ensure that the principal amount and the loan fee have been fully repaid.

    What Makes AAVE So Special

    AAVE’s uniqueness is underscored by its commitment to redefining traditional financial paradigms through decentralized finance. Aave is famous for its decentralization, innovative flash loans, governance mechanism, Safety Module, and support for a wide range of collateral assets. These features make it a unique service in the DeFi world, giving lenders different opportunities for advanced financial strategies.

    Conclusion

    Aave stands out as a pioneering DeFi service that has transformed the traditional lending landscape. It operates on smart contracts offering users a great choice of cryptocurrencies. The integration with multiple blockchain networks reflects the project’s desire to provide a seamless user experience. With ongoing developments and integrations, Aave may play a crucial role in the future of decentralized finance.

  • How to Transfer Crypto from Coinbase to BTCC?

    How to Transfer Crypto from Coinbase to BTCC?

    How to transfer crypto from Coinbase to BTCC?

    Coinbase is one of the most popular cryptocurrency exchanges, especially among US customers. However, the exchange offers virtually no options for users who want to engage in crypto derivatives contract trading.

    BTCC, on the other hand, is a derivatives-focused digital asset trading platform that lets traders take advantage of futures contracts and turn both negative and positive market moves into potentially lucrative investment opportunities.

    If you are wondering how to transfer your digital assets from Coinbase to BTCC, look no further – in this article, we are going to highlight the benefits of transferring crypto to BTCC and explain the process of moving crypto from Coinbase to BTCC in a detailed step-by-step guide.

    What are the benefits of depositing crypto to BTCC?

    Founded in 2011, BTCC is one of the pioneers of cryptocurrency trading, enabling digital asset users to engage in digital asset markets via a number of different trading instruments. BTCC allows users to turn a profit while predicting future price movements of Bitcoin, Ethereum, and other popular crypto assets.

    BTCC offers perpetual, daily, weekly, and quarterly USDT-denominated futures contracts. In addition, users can take advantage of up to 150x leverage to magnify their exposure to market movements. 

    Here are the main benefits of using the BTCC cryptocurrency exchange:

    • Established in 2011, BTCC is the longest-running cryptocurrency exchange in the industry
    • BTCC users can utilize up to 150x leverage when trading Bitcoin and Ethereum daily futures
    • The exchange offers access to USDT-denominated futures contracts with expiration (Daily, Weekly, Quarterly) and no expiration dates (Perpetual)

    Register an account on BTCC within minutes

    If you don’t have an account already registered with BTCC, you can open a new one in just a couple of clicks – simply click on the link below and follow the instructions.

    New users are greeted with exclusive perks that entail up to 3,500 USDT in rewards when depositing funds to BTCC. Keep in mind that the promotion is available to users that fund their BTCC account within 7 days of the initial registration.

    For more information about the signup process and general trading tips, check this helpful blog post published by the BTCC team.

    Deposit crypto to BTCC from Coinbase

    With the brief introduction of the BTCC exchange and its main benefits behind us, you are probably itching to fund your BTCC account with crypto. If you already have a part of your portfolio stored on Coinbase, this guide will show you how to move it to BTCC. 

    Do note that the steps outlined below showcase the process of transferring crypto from Coinbase to BTCC using each respective exchange’s mobile apps. The process is virtually the same when using desktop clients.

    Step 1 

    After successfully logging into your BTCC account, click on the “Deposit” button located in the “Assets” menu.

    BTCC crypto exchange app home screen

    Step 2

    Continue by choosing your desired deposit digital currency. In this guide, we will be sending Tether (USDT) over the Ethereum network (ERC–20). Keep in mind that selecting the same blockchain network on the deposit and withdrawal platform is paramount. Selecting a different blockchain network can result in a permanent loss of funds.

    Choose crypto to transfer from Coinbase to BTCC

    Step 3

    Click on the “Copy Address” button to store the blockchain address in the clipboard. If you’ve selected a cryptocurrency that requires additional information to facilitate a transfer, like XRP with its destination tag, copy that information as well.

    Copy USDT blockchain address from BTCC

    Step 4

    Log in to your Coinbase account and withdraw the digital asset you wish to move to the BTCC crypto exchange. 

    Step 5

    Click on “Send” on the Coinbase home screen to initiate a crypto transfer.

    Coinbase send feature

    Step 6

    Select the cryptocurrency you wish to transfer from Coinbase to BTCC. As mentioned before, we are using USDT (ERC-20 variant) for the purposes of this guide. After selecting crypto, enter the amount to funds you wish to transfer and click “Continue”.

    Entering amount of USDT to transfer from Coinbase to BTCC

    Step 7

    Paste the blockchain address you’ve copied from BTCC (see Step 3) and paste it into the dedicated text field. You can store often-used addresses in your contacts lists as well. After making sure the address you’ve pasted is indeed correct, proceed by clicking the “Preview send” button.

    Pasting BTCC wallet address to Coinbase

    Step 8

    Before confirming your transfer, you can choose to add an optional note for your recipient. After reviewing the parameters of your transaction, click “Send now” to execute a cryptocurrency transfer. 

    Sending 10 USDT from Coinbase to BTCC

    Step 9

    Navigate back to the Assets menu in the BTCC app to check whether the funds withdrawn from Coinbase have arrived. Click on the USDT option (or any other supported crypto you’ve transferred) to open “Transaction Details”. Keep in mind that the speed of transactions can vary depending on the level of network congestion, so you might have to wait a couple of minutes before funds are deposited in your BTCC account.

    BTCC transaction details

    Wrapping up

    With funds available in your BTCC account, you can take advantage of a comprehensive crypto futures trading offering provided by a platform that has been around nearly as long as Bitcoin itself. Hopefully, this article helped you transfer crypto from Coinbase to BTCC, enabling you to turn a profit by predicting future price movements of popular coins and tokens. 

    If you are interested, you can take a look at other similar guides, showing how to transfer crypto to BTCC from Binance US, FTX US, Kraken, and KuCoin:

  • How to Transfer Crypto from KuCoin to BTCC?

    How to Transfer Crypto from KuCoin to BTCC?

    How to transfer crypto from KuCoin to BTCC

    Transferring cryptocurrency between various digital asset exchanges can allow investors to pursue lucrative investment opportunities across a wide spectrum of different platforms that exist in the blockchain space.

    As a rule of thumb, different exchanges are focusing on different aspects of crypto trading. Some exchanges are geared toward supporting as many different digital assets as possible, while others focus on the sheer number of available features and trading tools.

    Founded in 2011, BTCC is the longest-running cryptocurrency trading platform, specializing in providing a top-tier cryptocurrency futures trading experience. In this article, we are going to highlight some of the main benefits of using BTCC and showcase how to move your crypto from KuCoin to BTCC.

    What are the pros of depositing crypto to BTCC?

    As mentioned in the brief introduction, BTCC is a crypto futures contract trading platform, enabling users to turn a profit by correctly predicting future price movements of digital assets. Depending on their needs, BTCC traders can use futures contracts with no expiration date (Daily, Weekly, Quarterly) and no expiration date (Perpetual)

    The highest level of leverage BTCC users can set when trading daily futures is 150x. The exchange allows investors to predict future price movements of a wide range of different crypto assets, including Bitcoin, Ethereum, Cardano, and many others. 

    Here are the main advantages of using the BTCC cryptocurrency exchange:

    • The BTCC crypto exchange has been providing digital asset trading options uninterruptedly since June 2011
    • BTCC users can use up to 150x leverage when day trading Bitcoin and Ethereum derivatives
    • BTCC runs weekly challenges and exclusive promotions that can help investors increase the degree of profitability of their futures investments

    Create an account on BTCC in just a couple of clicks

    Registering an account on BTCC is very simple and takes a very short amount of time. After opening an account, users can, but are not required to supply their personal information. If you wish to register a BTCC account, please proceed by following the link below.

    It is worth mentioning that new BTCC users can take advantage of an exclusive promotion that awards newcomers with up to $3,500 worth of USDT rewards. New users who deposit funds on the platform within 7 days of opening an account are eligible for the promotion.

    Deposit crypto to BTCC from your KuCoin account

    If you’ve never moved your funds between exchanges, there’s no reason to be nervous. The whole process is very simple and takes only a few minutes at most. Follow our step-by-step guide below to see how to transfer your cryptocurrency from KuCoin to BTCC. Keep in mind that the guide showcases the process using BTCC and KuCoin mobile apps. The process is almost identical when using desktop clients. 

    Step 1

    Log in to your BTCC account and click on the “Deposit” button nested in the “Assets” menu.

    Step 2

    Continue by choosing your desired deposit currency. For the purposes of this guide, we will be using Tether (USDT), specifically the ERC-20 variant. Keep in mind that selecting the same blockchain network on the deposit and withdrawal platform is paramount. Selecting a different blockchain network can result in a permanent loss of funds.

    Step 3 

    Click on the “Copy Address” button to store the blockchain address in the clipboard. If you’ve selected a cryptocurrency that requires additional information to facilitate a transfer, like XRP and its destination tag, copy that information as well.

    Step 4

    Log in to your KuCoin account and withdraw the digital asset you wish to move to the BTCC crypto exchange. We will show you how to do it in steps 5 through 9.

    Step 5 

    Select “Assets” from the menu at the bottom of the screen. Continue by selecting the “Main” tab at the top of the screen and then click on “Withdraw”. At this point, it is worth mentioning that KuCoin will ask you to set up two-factor authentication (2FA) and a transaction PIN if this is your first time withdrawing cryptocurrency with KuCoin.

    Step 6

    Search for the crypto you would like to send to BTCC in the search field located at the top of the screen. In our example, we’ll be using USDT. After locating the digital asset, click on it.

    Step 7

    You will be greeted with a “Withdraw Crypto” menu. From here, you can select the parameters of your transaction. First, we will be selecting the blockchain network USDT will be sent on. Click on the “Network” menu (highlighted in red in the image below).

    Step 8

    Select the “Ethereum (ERC-20)” option from the menu. As a reminder, you should always use the same network that was selected when copying the address on BTCC (see Step 2).

    Step 9

    Paste the blockchain address you’ve copied from BTCC and enter the amount of funds you would like to transfer. After setting all parameters of your transfer, click on “Withdraw”. If this is your first time transferring money between blockchain addresses, you might want to send a smaller amount first, to make sure that everything is working as intended.

    Step 10

    Head back to the Assets menu in the BTCC app to see whether the funds withdrawn from KuCoin have arrived. Click on the USDT option to open “Transaction Details” to view detailed information about recent transfers. Keep in mind that the speed of transactions can vary depending on the level of network congestion, so you might have to wait a couple of minutes before funds are deposited in your BTCC account.

    Final thoughts

    By funding your BTCC account, you can tap into a rich cryptocurrency derivatives trading offering with more than a decade-long track record. Hopefully, this article helped you transfer cryptocurrency from KuCoin to BTCC. 

    If you are interested, you can take a look at other similar guides, showing how to transfer crypto to BTCC from Binance US, FTX US, Kraken, and Coinbase:

  • How to Transfer Crypto from Kraken to BTCC?

    How to Transfer Crypto from Kraken to BTCC?

    How to transfer crypto from Kraken to BTCC

    BTCC is one of the leading cryptocurrency derivatives exchanges in the blockchain space. Founded in 2011, BTCC offers a wide range of futures trading tools that allows crypto investors to earn a profit by correctly predicting future price movements of crypto assets. 

    For an added layer of exposure to the markets, BTCC allows traders to use up to 150x leverage, which means that minute market movements can be turned into lucrative investment opportunities with ease. 

    In this article, we will demonstrate how users can send their crypto from primarily spot trading focused Kraken to a crypto futures-specialized BTCC platform.

    Why move your crypto from Kraken to BTCC?

    As we’ve touched upon in the brief introduction, BTCC is a crypto derivatives-focused trading platform that allows traders to turn a profit by correctly identifying market trends and predicting future price movements of digital currencies like Bitcoin, Ethereum, and many more. BTCC users can choose from a number of future contract types, including daily, weekly, quarterly, and perpetual contracts.

    While the Kraken platform features many products and services, ranging from an expansive spot market offering to a wide range of passive income-generating options, its futures trading offering pales in comparison to the one provided by BTCC. A glaring omission in Kraken’s offering, for instance, is the lack of non-perpetual futures instruments.

    Here are the main advantages of using the BTCC crypto futures exchange:

    • BTCC is the longest-running digital asset trading platform in the blockchain space, uninterruptedly serving its customers since June 2011
    • One of the most attractive features of the BTCC exchange is the ability for users to use up to 150x leverage when trading futures
    • BTCC runs weekly challenges and exclusive promotions that can help investors reach a higher level of profitability than on competing platforms

    Register an account on BTCC in just a couple of clicks

    If you don’t yet have an account registered with BTCC, don’t worry, the whole process is very simple and takes less than a minute to complete. If you wish to open an account on BTCC, please proceed by clicking on the button below.

    In addition to a wide range of supported digital assets, BTCC runs an enticing promotion tailored for newcomers. Within 7 days since the initial registration is made, users can claim up to $3,500 in USDT rewards by depositing funds and trading on the platform.

    Deposit crypto to BTCC from Kraken

    Transferring cryptocurrency from Kraken to BTCC is very straightforward and requires no advanced crypto knowledge. While the guide below features screenshots from the BTCC app, do note that the process of depositing crypto to BTCC is virtually the same as using the desktop client.

    Step 1

    After successfully logging into your BTCC account, click on the “Deposit” button located in the Assets menu.

    Step 2

    Continue by choosing your desired deposit currency. For the purposes of this guide, we will be using Tether (USDT), specifically the ERC-20 variant. Keep in mind that selecting the same blockchain network on the deposit and withdrawal platform is paramount. Selecting a different blockchain network can result in a permanent loss of funds.

    Step 3 

    Click on the “Copy Address” button to store the blockchain address in the clipboard. If you’ve selected a cryptocurrency that requires additional information to facilitate a transfer, like XRP and its destination tag, copy that information as well.

    Step 4

    Log in to your Kraken account and withdraw the digital asset you wish to move to the BTCC crypto exchange.

    Step 5

    Navigate to the “Balances” menu and proceed by clicking on the “Withdraw” button.

    Step 6 

    For the purposes of this guide, we will be withdrawing USDT. The process is virtually the same for any of the supported digital currencies. 

    Step 7

    Select the network you’ll be using to send USDT from Kraken to BTCC. In our example, we’ll be using the Ethereum network, so we need to select the “Tether USD (ERC20)” option. 

    Step 8

    In the “Wallet address” field, paste the blockchain address you’ve previously copied from the BTCC app. Click “Next” to continue.

    Step 9

    Enter the amount of USDT you wish to withdraw from Kraken. If this is your first time transferring money between blockchain addresses, you might want to send a smaller amount first, to make sure that everything is working as intended. Click “Review” to proceed.

    Step 10

    After reviewing the parameters of the withdrawal, namely the blockchain network used, the withdrawal amount, and the fee, swipe a finger over the bottom of the screen to confirm the transfer.

    Step 11

    Head back to the Assets menu in the BTCC app and click on the USDT option to open “Transaction Details” to view detailed information about recent transfers. Keep in mind that the speed of transactions can vary depending on the level of network congestion, so you might have to wait a couple of minutes before funds are deposited in your BTCC account.

    Bottom line

    Depositing cryptocurrency from Kraken to BTCC is fast, secure, and the whole process can be completed within just a couple of minutes. Once the funds are successfully deposited in your BTCC account, you are free to tap into crypto futures markets and take advantage of BTCC’s wide range of derivatives contracts and sophisticated trading tools. Hopefully, this article served its purpose and was successful in helping you transfer crypto funds from Kraken to BTCC.

    If you are interested, you can take a look at other similar guides, showing how to transfer crypto to BTCC from Binance US, FTX US, KuCoin, and Coinbase:

  • How to Transfer Crypto from Binance US to BTCC?

    How to Transfer Crypto from Binance US to BTCC?

    How to transfer crypto from Binance US to BTCC crypto futures exchange

    Moving cryptocurrency between digital asset trading platforms can provide plenty of upside to crypto traders. For starters, different exchanges offer various trading pairs, trading features, and loyalty perks. In addition, certain trading platforms specialize in specific domains, such as derivatives trading or access to a large number of altcoins.

    The BTCC cryptocurrency exchange is one of the premier destinations for cryptocurrency futures traders. Founded in June 2011, BTCC offers a wide range of crypto derivatives trading tools and a rich selection of USDT-denominated futures contracts. 

    In this article, we are going to take a closer look at the benefits of transferring crypto from Binance US to BTCC and provide a step-by-step guide to depositing digital assets on BTCC from your Binance US account.

    What are the pros of sending crypto from Binance US to BTCC?

    Binance US is the US market-facing arm of the international Binance cryptocurrency exchange. Contrary to its international counterpart, Binance US offers no derivatives trading products and lacks a number of features users of the global platform can take advantage of.

    On the other hand, BTCC is a cryptocurrency exchange that prides itself on providing a top-tier futures trading experience for cryptocurrency investors. Traders are able to capitalize on market movements of popular crypto assets like Bitcoin, Ethereum, Cardano, and others, using daily, weekly, quarterly, and perpetual contracts. Moreover, BTCC allows traders to use up to 150x leverage, for an added layer of exposure to crypto market price movements. 

    Here are the main advantages of using the BTCC cryptocurrency exchange:

    • BTCC is the longest-running cryptocurrency exchange in the sector, with 11 years of uninterrupted service
    • BTCC users can use up to 150x leverage when day trading Bitcoin and Ethereum derivatives
    • The exchange boasts futures contracts with expiration (Daily, Weekly, Quarterly) and no expiration dates (Perpetual)

    Open an account on BTCC

    Registering an account on BTCC is a straightforward process that can be completed in just a couple of clicks. If you wish to open an account on BTCC, please click on the button below.

    BTCC is greeting new users with an exclusive promotion that awards newcomers with up to 3,500 USDT in rewards. The promotion is available to users that fund their BTCC account within 7 days of the initial registration.

    For more information about the signup process and general trading tips, check this helpful blog post published by the BTCC team.

    Deposit crypto to BTCC from Binance US

    In the following step-by-step guide, we are going to demonstrate how you can move crypto from Binance US to the BTCC crypto exchange. If you’ve never done this before, don’t worry – the process is extremely simple and requires no advanced knowledge. Keep in mind that the steps outlined below feature screenshots from the BTCC app. However, the process of depositing crypto to BTCC is virtually the same on desktop.

    Step 1

    After successfully logging into your BTCC account, click on the “Deposit” button located in the Assets menu.

    Step 2

    Continue by choosing your desired deposit currency. For the purposes of this guide, we will be using Tether (USDT), specifically the ERC–20 variant. Keep in mind that selecting the same blockchain network on the deposit and withdrawal platform is paramount. Selecting a different blockchain network can result in a permanent loss of funds.

    Step 3

    Click on the “Copy Address” button to store the blockchain address in the clipboard. If you’ve selected a cryptocurrency that requires additional information to facilitate a transfer, like XRP and its destination tag, copy that information as well.

    Step 4

    Log in to your Binance US account and withdraw the digital asset you wish to move to the BTCC crypto exchange.

    Step 5

    After logging into your Binance US account, click on the “Dashboard” option located in the user drop-down menu in the top right corner of the homepage.

    Step 6 

    By clicking on the arrow (highlighted in red in the image below), you will be able to search through the whole list of supported digital assets on Binance US. For the purposes of this guide, we will be searching for USDT. 

    Step 7

    After you’ve found the crypto asset you wish to deposit to BTCC, click on it. You will be taken to the coin’s dashboard.

    Step 8

    Click on “Withdraw” to commence the withdrawal process.

    width-40

    Step 9

    Enter the amount of cryptocurrency you wish to transfer and enter the corresponding blockchain address (in our case, the USDT deposit address copied from our BTCC account). After filling out other transaction parameters, click on “Preview Withdrawal” to proceed. Confirm your transaction when ready.

    Step 10

    Head back to the Assets menu in the BTCC app and click on the USDT option to open “Transaction Details” to view detailed information about recent transfers. Keep in mind that the speed of transactions can vary depending on the level of network congestion, so you might have to wait a couple of minutes before funds are deposited in your BTCC account.

    Final thoughts

    As you can see, transferring cryptocurrency from Binance US to BTCC is very intuitive and can be done in just a couple of minutes. With the funds successfully deposited in your BTCC account, you can tap into crypto futures markets and take advantage of BTCC’s wide range of derivatives contracts and sophisticated trading tools.

    If you are interested, you can take a look at other similar guides, showing how to transfer crypto to BTCC from FTX US, KuCoin, Coinbase, and Kraken:

  • How to Transfer Crypto from FTX US to BTCC?

    How to Transfer Crypto from FTX US to BTCC?

    How to transfer crypto from FTX US to the BTCC crypto futures exchange

    Moving digital assets between exchange platforms enables cryptocurrency traders to pursue lucrative investment opportunities across the crypto landscape. The unrestricted flow of funds allows users to take advantage of exclusive trading promotions and to tap into cryptos that are available only on certain digital assets trading platforms.

    There are few crypto exchanges in the space with a resume as rich as the BTCC trading platform. Not only has the exchange been around since the early days of Bitcoin, it also offers a competitive suite of trading products and services, specifically tailored for crypto futures traders. 

    In this article, we will take a look at how to deposit digital assets from a primarily spot-oriented FTX US to a futures-specialized BTCC and discuss the main benefits of doing so.

    What are the benefits of depositing crypto to BTCC?

    In the 11 years since its founding, BTCC has established itself as the leading player in the cryptocurrency futures trading arena. While FTX US does offer a commendable selection of spot trading pairs and market tools, it lacks the investment options for users who are looking to pursue crypto derivatives trading. 

    BTCC boasts up to 150x leverage for futures contracts, which allows users to capitalize on minute market movements and make profitable trades regardless of which way the market moves. In addition, the BTCC exchange also runs special promotions, such as the 3,500 USDT welcome bonus and trading leaderboards. Moreover, the BTCC Academy houses numerous helpful articles ranging from basic crypto subjects to advanced research and analysis pieces.

    Here are the main pros of using the BTCC cryptocurrency exchange:

    • Founded in June 2011, BTCC is the longest-running cryptocurrency exchange in the world
    • BTCC allows derivates traders to gain exposure to crypto markets with up to 150x leverage
    • Exclusive promotions and weekly challenges enable BTCC users to increase their profit-generating potential

    Register an account on BTCC 

    Registering an account on BTCC requires only a couple of clicks and can be completed in less than a minute. If you wish to create an account on BTCC, please click on the button below.

    As we’ve mentioned before, BTCC welcomes new users with a special promotion that can net them up to 3,500 USDT. Keep in mind that the promotion is available only to users who deposit funds to BTCC within 7 days since the initial registration was made. 

    For more information about the signup process and general trading tips, check this helpful blog post published by the BTCC team.

    Deposit crypto to BTCC from FTX US

    Transferring cryptocurrency from FTX US to BTCC is very straightforward and requires no advanced crypto knowledge. The guide below features screenshots from the BTCC app, however, the process of depositing crypto to BTCC is virtually the same on desktop.

    Step 1

    After successfully logging into your BTCC account, click on the “Deposit” button located in the Assets menu.

    Step 2

    Continue by choosing your desired deposit currency. For the purposes of this guide, we will be using Tether (USDT), specifically the ERC20 variant. Keep in mind that selecting the same blockchain network on the deposit and withdrawal platform is paramount. Selecting a different blockchain network can result in a permanent loss of funds.

    Step 3

    Click on the “Copy Address” button to store the blockchain address in the clipboard. If you’ve selected a cryptocurrency that requires additional information to facilitate a transfer, like XRP and its destination tag, copy that information as well.

    Step 4

    Log in to your FTX US account and withdraw the digital asset you wish to move to the BTCC crypto exchange.

    Step 5

    Select the “Wallet” tab from the menu at the bottom of the screen and click “Withdraw” to proceed.

    Step 6

    Navigate to the cryptocurrency you wish to transfer from FTX US to BTCC. In our case, we are moving USDT. 

    Step 7

    Click on the digital currency you wish to transfer in order to proceed to the next step.

    Step 8

    Enter the amount of cryptocurrency you wish to transfer and enter the corresponding blockchain address (in our case, the USDT deposit address copied from our BTCC account). After filling out other transaction parameters, click on “Withdraw” to finalize the transfer.

    Step 9

    Head back to the Assets menu in the BTCC app. The funds should be available in your BTCC account. Keep in mind that the speed of transactions can vary depending on the level of network congestion.

    Bottom line

    Depositing cryptocurrency on the BTCC exchange offers several benefits, particularly for those who are keen on trading crypto derivatives and are looking for an established and long-running exchange to do so. Hopefully, this article helped you transfer crypto from FTX US to BTCC as the first step in the long and successful futures trading journey. 

    If you are interested, you can take a look at other similar guides, showing how to transfer crypto to BTCC from KuCoin, Coinbase, Kraken, and Binance US:

  • Walken on Bybit Launchpad – How to Invest in WLKN IEO?

    Walken on Bybit Launchpad – How to Invest in WLKN IEO?

    Walken (WLKN) Bybit Launchpad

    Walken (WLKN) is the latest cryptocurrency project featured on Bybit Launchpad, a platform that allows verified Bybit users to participate in the initial exchange offering (IEO) of promising blockchain projects. Out of the total WLKN supply of 2 billion tokens, 20 million WLKN tokens will be distributed in the Launchpad program, at an initial token sale price of 0.0165 USDT. Bybit will distribute 14 million WLKN to users subscribing with BitDAO (BIT) and 6 million WLKN to users participating in the lottery draw with their Tether (USDT).

    Walken is a GameFi project built on the Solana (SOL) blockchain that features NFT-powered in-game characters called CATheletes and unique Move-to-Earn monetization mechanics. The app’s native token WLKN can be used to upgrade, buy, and sell NFT characters, and to participate in the platform’s governance.

    Walken is the third project to be featured on the revamped version of Bybit’s Launchpad platform. Whereas previously, verified Bybit users were able to participate in IEOs only with their BIT holdings, they can now participate using their USDT as well. However, using USDT doesn’t grant direct access to WLKN tokens. Instead, USDT participants will be randomly selected in a lottery draw, which will award 8,000 separate allocations, each worth 750 WLKN.

    Here’s an overview of important dates pertaining to the Walken IEO:

    StartEnd
    Snapshot PeriodJune 16 (00:00 UTC)June 20 (23:59 UTC)
    Subscription PeriodJune 21 (03:30 UTC)June 21 (10:59 UTC)
    Distribution PeriodJune 21 (11:00 UTC)June 21 (11:59 UTC)
    Launch PeriodJune 21 (12:00 UTC)/

    How to invest in the Walken (WLKN) IEO on Bybit Launchpad?

    In this guide, we will show you how to participate in the Walken Launchpad program. Keep in mind that only users who have completed the necessary KYC steps and hold BIT or USDT in their accounts are eligible to participate.

    1. Create an account on Bybit and verify your account

    In order to participate in the WLKN IEO, you will first need to create an account on Bybit. You can skip this step if you are already a registered Bybit user.

    Bybit's registration page

    Once the account registration process is successfully completed, you can proceed to the account verification procedure. Bybit offers two verification tiers, which primarily differ in the amount of daily Bitcoin withdrawals. It is worth noting that both KYC levels unlock access to Launchpad functionality.

    How to Pass KYC on Bybit?

    Once you’ve supplied the required personal information and completed the KYC process, you can proceed to the Launchpad section, which can be found by navigating to the bottom of the “More” drop-down menu on the Bybit homepage.

    Bybit Launchpad section on the Bybit homepage

    2. Select Walken from the list of Launchpad projects

    Locate Walken from the list of ongoing and finished Launchpad projects. The most recent and typically the only active project is listed at the top of the list.

    Select Bybit Launchpad project from the list of completed and ongoing IEOs

    3. Walken IEO requirements and token distribution

    As mentioned before, Bybit users get a chance to take part in public sales by committing an amount of BIT or USDT that will be used to buy new tokens as soon as they are first available on the exchange. The amount of new tokens a user receives in the sale is directly proportional to the amount of BIT committed. You will need at least an average of 50 BIT or 100 USDT in your Spot, ByFi, or Derivatives account during the 5-day snapshot period, to be eligible for the public sale.

    In order to give each user a fair chance at obtaining WLKN, Bybit has set a hard cap of 20,000 WLKN for users committing BIT. Moreover, each USDT lottery winner will receive a 750 WLKN allocation. Users that won’t be selected in the lottery draw will receive the full amount of USDT committed back once the program ends.

    Do note that participation in the Walken public sale is restricted to residents of the following jurisdictions: the United States, mainland China, Singapore, Quebec (Canada), North Korea, Cuba, Iran, Crimea, Sevastopol, Sudan, and Syria.

    4. Walken IEO Timeline

    The Walken IEO will follow a strict Launchpad schedule; below, you will find a complete overview of the important dates you will have to keep in mind, as explained by Bybit:

    • June 16 (00:00 UTC) to June 20 (23:59 UTC) – Snapshot Period: The average daily amount of BIT in your Spot Account, ByFi Account, and Derivatives Account during the snapshot period must be equal to or greater than 50 in order to participate in the token sale. Likewise, the daily average to participate in the lottery draw must be equal to or greater than 100 USDT.
    • June 21 (03:30 UTC) to June 21 (10:59 UTC) – Subscription Period: You can commit a certain number of BIT or USDT in your Spot Account towards the new project. The number of BIT or USDT you’ve committed will be locked until the public sale ends.
    • June 21 (11:00 UTC) to June 21 (11:59 UTC) – Distribution Period: Based on your final APEX allocation result, the corresponding BIT or USDT equivalent will be deducted from your committed amount, while your WLKN allocation and the remaining BIT will be credited back to your Spot Account. The remaining amount of USDT will be credited back to your Spot Account. Non-winning lottery participants will get the full amount of USDT back.
    • May 5 (12:00 UTC) – Launch Period: The new Spot pair, WLKN/USDT, will open for trading as long as liquidity conditions are met.

    5. Walken step-by-step Launchpad guide

    Now that you are familiar with the project and the intricacies of Bybit’s Launchpad program, follow our step-by-step instructions to learn how to commit your BIT or USDT holdings. Do note that some of the following images are from a previous Launchpad event.

    Step 1 – Select to subscribe with your BIT holdings or commit USDT to gain a chance of being one of the lottery draw winners. The process for committing BIT and USDT is very similar.

    Bybit Launchapd BIT and USDT allocation page
    Select the “Subscription” option to participate in the Launchpad with BIT and the “Lottery” to participate with USDT.

    Step 2 – Proceed by entering the amount of BIT you wish to commit to the sale and click on the “Commit Now” button. Committing USDT doesn’t involve entering your precise token amount, since every lottery ticket costs 100 USDT. Keep in mind that you can’t participate in the Launchpad with BIT after you’ve decided to enroll in the lottery draw.

    Confirming Bybit Launchapd USDT lottery subscription

    After committing USDT, you will be given a lottery number and see how many participants are currently in the draw.

    Bybit Launhchpad lottery ticket

    Step 3 – When using BIT, you can choose to commit additional funds after the initial investment has been made. You can increase your investment up to your daily average BIT balance, which was calculated during the Snapshot Period.

    Commiting BIT on Bybit Launchpad

    When the Launchpad period ends you will be notified about your lottery draw status. The first image below shows what you can expect to see in the event of a lottery win, while the second image shows what to expect if you were unfortunate in the draw.

    Bybit Launchpad USDT lottery winning message
    Winning lottery message.
    Bybit Launchpad USDT lottery losing message
    Lossing lottery message.

    6. Performance of past Bybit Launchpad projects and closing thoughts

    Projects listed on the Bybit Launchpad have historically performed very well and have enjoyed a notably positive market reception once they’ve started trading in the spot markets. With a revamped program, Bybit looks to expand the service to users who might not be inclined to hold BIT but have USDT readily available. Here’s an overview of the five most lucrative Bybit Launchpad projects and their USD-adjusted returns:

    Launchpad ProjectROI (expressed in USD)
    Genopets (GENE)12.59x
    Apex Protocol (APEX)4.04x
    Pintu Token (PTU)2.58x
    Kasta (KASTA)1.75x
    Realy (REAL)1.37x
    *Data collected on June 13, at 2:45 PM UTC.